
Resources
Help & articles
Guides, how-tos and news for your catering business.
Help topics
Menu & Items
Item Options
Add selectable options to items — portion sizes, dietary variants — with optional surcharges that flow through to quotes, dockets and your online store.
Add selectable options to items — like portion sizes or dietary variants — with optional surcharges that flow through to quotes, dockets, and your online store. Or list what an item includes, so it shows everywhere without anyone choosing anything.
What Are Item Options?
Item options let you attach selectable choices to any item — for example, portion sizes (small, medium, large) or dietary variants (gluten free, regular). Each option can carry an optional surcharge on top of the item’s base price.
Options are configured on the item itself and then appear wherever that item is used: in quotes, on chef dockets, and in your online store.
Setting Up Option Groups
To add options to an item, open the item’s edit panel and scroll to the Options & Includes section. Click + Add group to create a group. Each group has a name (e.g. “Portion Size”) and contains one or more individual option values, each with an optional surcharge.
Options or Includes
Every group starts with a toggle: Options or Includes. Options is a choice the customer makes. Includes is what comes with the item, so every line in the group is always on the order and none of it is selectable. Choosing Includes hides the selection type, the compulsory tick and the Default pills, because none of them apply once there is nothing to choose.
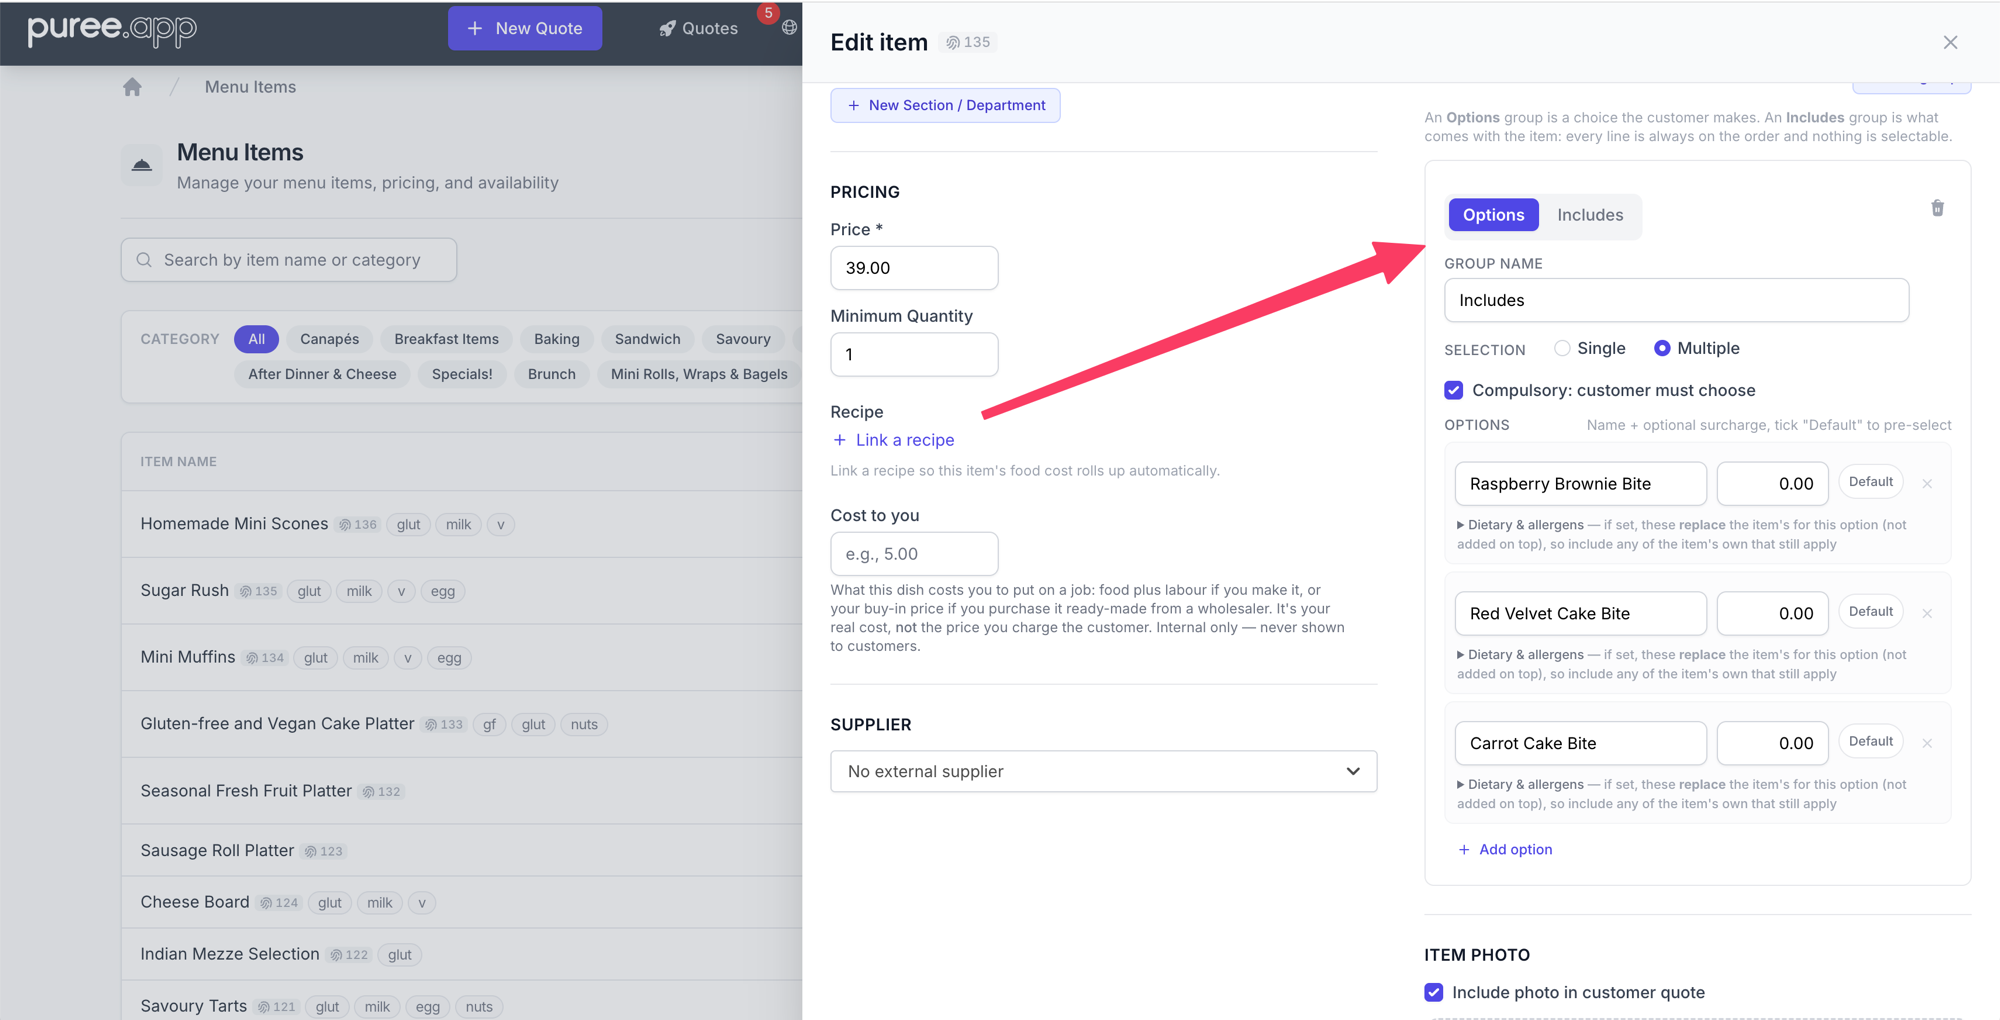
Use Includes for the things that define the item rather than vary it: the three components of a Devonshire tea, written as text. They appear on quotes, dockets and your online store the same way options do, headed Includes instead of Options, but as plain text rather than buttons. Nothing a customer does can change them.
Options, Includes, a bundle, or a package?
They sit close together in the app, and they all put lines on a quote. They answer different questions:
- Options are a choice. The customer (or you, on a quote) picks a filling, a portion size, a bread type. Someone decides, every time. A surcharge can ride along.
- Includes are wording. The item comes with plain scones, fruit scones, and jam and cream. That text prints on the quote and the docket. The kitchen is not given three extra dishes to prep — only the words.
- A bundle is the item itself: a platter or boxed lunch made of other catalogue items. Tick This item is a bundle directly under the item name. Each content line names a real item and a quantity. The customer still sees one priced line; the chef docket gets the sandwiches and cookies as their own rows. If a content item has its own options, the quote builder opens with the defaults selected and you can change them for that line. Includes on that content travel with it — wording and any surcharge, always on. A surcharge on a content option or include is added to the bundle and shown right after the name as (additional $12.00) (your account currency).
- A package is the shape of an event, priced per guest. Staff, room hire, “pick three canapés”. You do not order twelve packages the way you order twelve lunch boxes. A package can contain a bundle.
One thing to know before you tick the bundle box: on a bundle, this whole section becomes the contents list, so the bundle itself does not offer options. Put the choices on the contents instead — a bread type belongs to the sandwich, not to the lunch box — and set which one is pre-selected on the contents row. Bundle setup is on our Bundles help page.
Should this accompaniment be a separate kitchen item?
Includes describes what always comes with an item. Options lets someone choose a variation or accompaniment. Both remain attached to the original item on dockets and reports; they do not create separate catalogue-item lines.
For example, Scones — Includes: Jam and cream keeps the jam and cream wording with the scones. It does not list or count jam and cream as a separate item.
If you need separate scones and jam and cream items on chef dockets, kitchen prep lists and reports, use a bundle containing both catalogue items. The bundle name alone does not create the scones content item.
See Bundles for setup, Options, Includes, Bundles and Packages: Which One Do You Mean? for the comparison, and Packages for events priced per guest.
A line in an Includes group can still carry a surcharge, and because it is always on the order that surcharge is always charged. Usually it is tidier to leave those at zero and put the money in the item’s own price.
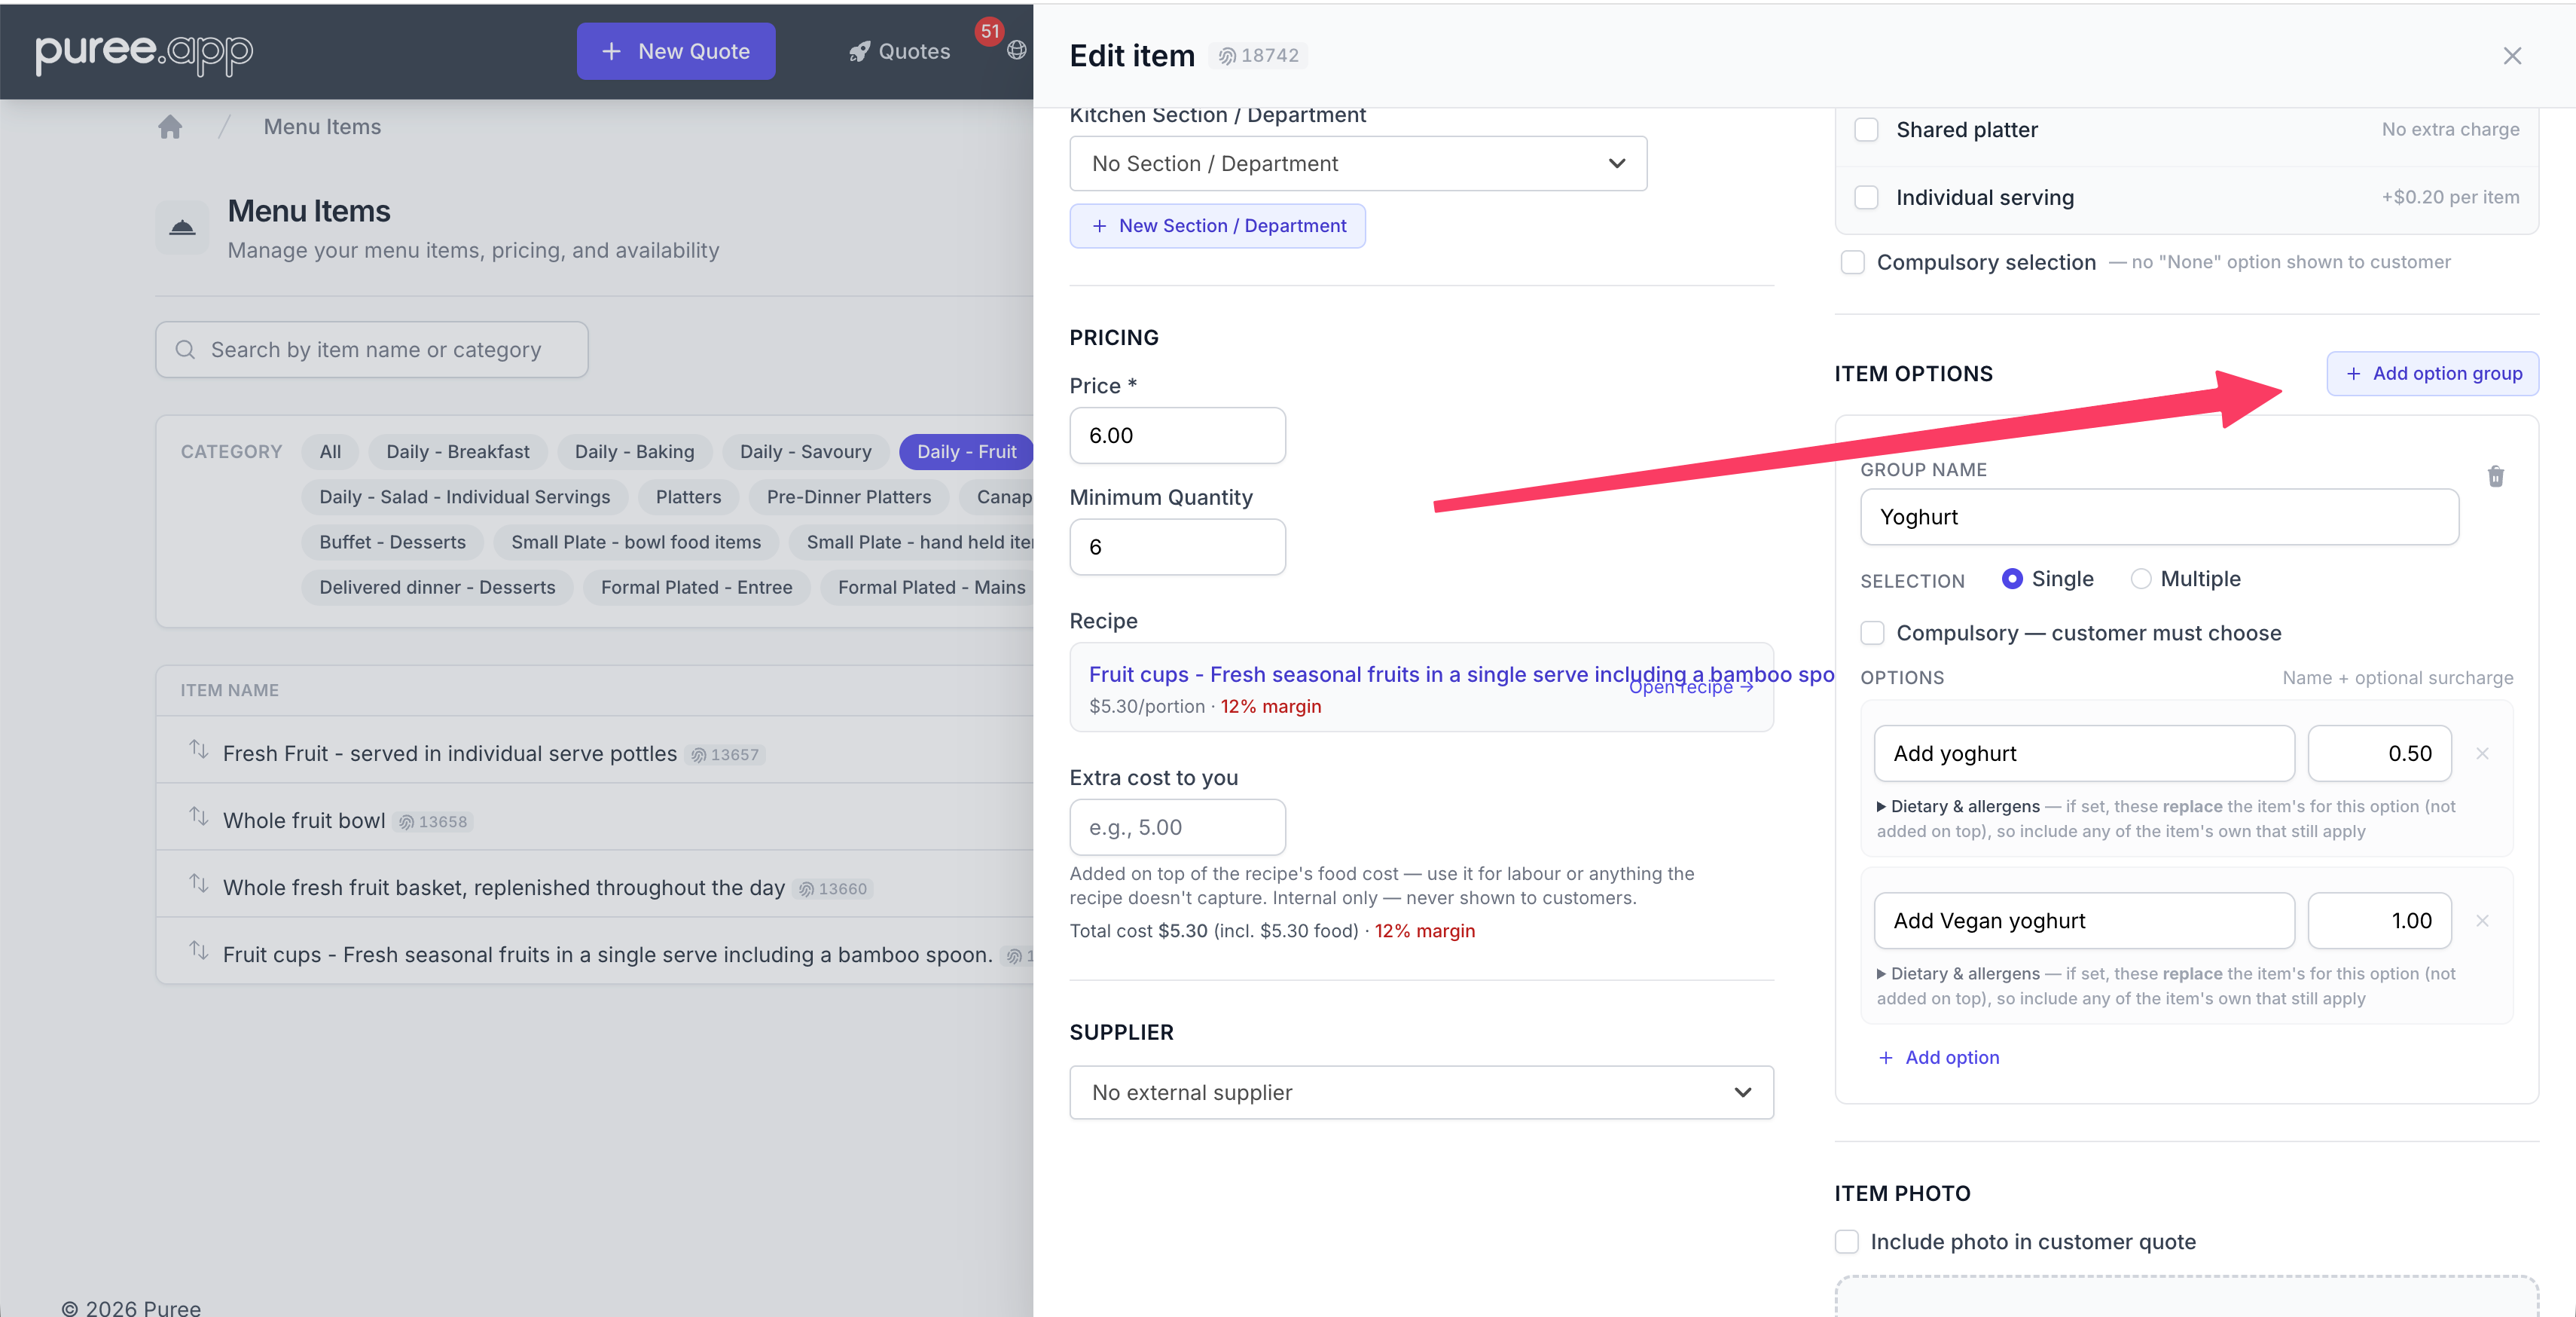
You can create as many groups as needed on a single item. For example, you might have a “Portion Size” group and a separate “Dietary” group on the same item.
Selection Type
Each group can be set to Single (the customer picks one option) or Multiple (the customer can pick several). For most use cases like portion sizes, single selection is the right choice.
Compulsory Options
Tick Compulsory on a group to require a selection before the item can be added to a quote or online order. If you try to add an item without choosing a compulsory option, Puree will prompt you to make a selection.
Option Values and Surcharges
Each option value has a name and an optional surcharge amount. The surcharge is added on top of the item’s base price — so if an item costs $2.50 and the “Large” option has a $1.50 surcharge, the total for that option is $4.00.
Leave the surcharge at zero if there’s no extra cost for that option (e.g. “Small” at no additional charge).
Beside the Extra charge each option has a Your cost field: what the option costs you, for example the difference between smoked salmon and ham. It is internal and never shown to customers. An option that charges nothing is taken to cost nothing unless you enter a cost; one that charges extra but has no cost leaves the item’s margin unknown rather than overstated. An option that is a catalogue item in its own right (a bundle’s contents, or a pick such as “choose your sandwich”) takes that item’s cost instead.
Default Options
Each option row has a Default pill. Tick it and that option arrives already selected whenever the item is added to a quote or an online order, so the choice most customers make doesn’t have to be re-picked every time. A Single group can only have one default; ticking a second releases the first. A Multiple group can have as many as you like, or none.
Defaults only fill in a group that has nothing chosen in it, so an existing quote keeps exactly the options it was saved with. That also means clearing every option on an optional group doesn’t stick: empty is the state that brings the defaults back, so the next time the line is opened they are ticked again. If a group needs a real “none” answer, add a “None” option to it and make that the default.
A compulsory group has always arrived with something selected. That used to be whichever option happened to be first in the list; now it’s whichever one you marked as the default, falling back to the first only where no default is set.
Tax on option surcharges
A paid option follows the tax band of the price it is added to:
- On a separately priced item, it uses that item’s band.
- On a bundle or one of its contents, it uses the bundle’s band. The bundle band overrides the contents’ individual bands.
- On an item or bundle included in a priced package, it uses the package’s band. The package band overrides both the item and bundle bands.
A quote’s Override all tax bands takes precedence over these settings. See Tax Rates.
Dietary & Allergens on Options
On menu items, each option value can carry its own dietary codes and allergens. Expand Dietary & allergens under an option to tag it. This is useful when the option changes what the dish actually contains — for example a Gluten Free base, or an Add Prawns option that introduces a shellfish allergen. (This only appears on menu items, matching the item’s own dietary section.)
When a selected option carries its own tags, they replace the item’s for that line — independently for each type. If the option sets dietary codes, they take over the item’s dietary codes; if it sets allergens, they take over the item’s allergens. An option that names only an allergen won’t change the item’s dietary codes, and vice versa. Where an option leaves a type blank, the item’s own codes still show through.
The resulting dietary codes and allergens follow the selection everywhere the item appears — quotes, chef dockets, and the online store — so the information always matches what the customer actually chose.
How Options Appear in Quotes
When adding an item to a quote, a selection panel appears showing the available options. Once selected, the chosen option name appears alongside the item name (e.g. Chocolate Brownie - Large) and the surcharge is reflected in the line total.
When editing an order, previously saved options are pre-populated so you can review or change them. An Includes group shows as plain text on the line rather than as buttons, since there is nothing to change.
Options on Dockets
The selected option is included in the item name on all dockets — chef dockets, driver dockets, and delivery run sheets. Kitchen staff can see at a glance which variant was ordered (e.g. Chocolate Brownie - Large).
Options in Your Online Store
If you have an online store enabled, item options appear on the product page when a customer adds an item to their cart. The price updates live as the customer selects different options, and their chosen option carries through to the quote when the order is placed.